Project
DIY GreenBox
The DIY GreenBox project demonstrates how to build a low-cost device that generates a high-voltage electrostatic field for experimenting with seed and plant development. Inspired by the experiments of Dr. Guido Ebner and Heinz Schürch, the method exposes seeds or eggs to an electric field without current flow, which reportedly enhanced growth, fertility, and sometimes produced ancient or primitive plant traits.
Published December 19, 2023
In the late 1980s, Swiss researchers Dr. Guido Ebner and Heinz Schürch made a groundbreaking discovery. In their laboratory experiments, they exposed grains and fish eggs to a simple high-voltage field, known as an “electrostatic field,” where no current flowed.
This electric field remarkably increased plant growth and fertility. Astonishingly, ancient forms of life, long thought extinct, began to reappear: ferns dating back millions of years, primitive corn with up to twelve cobs per stalk as once found in South America, and the extinct rainbow trout with salmon hooks. These experiments were later replicated at the Guido Ebner Institute. Meanwhile, some enthusiasts successfully cultivated potatoes, corn, wheat, and tomatoes using this method.
Seeds from the electric field proved to be more productive than modern seed varieties, requiring less fertilizer and reducing the need for pesticides. Moreover, this technique maintains genetic integrity as it involves no genetic manipulation, making it accessible and affordable for all.
Since late 2013, the Greenbox has been produced by FIOS (Food In Open Source) and is available for purchase at https://fios-greenbox.net. This open-source technology allows for further enhancements by anyone. I am eager to share my prototype, which can be built at a significantly lower cost, offering the opportunity to experiment with a broader range of E-field strengths. If you are not a handyman or DIY type it is best to purchase the greenbox from FIOS.
⚠️ Safety Warning: The DIY GreenBox project involves handling high-voltage equipment. It's crucial to follow all safety guidelines and use appropriate protective measures when working with electricity. Remember, high voltage can be dangerous, and improper handling can lead to serious injury or damage. Ensure that you are well-informed and competent in dealing with electrical systems before attempting this project. The information provided is for educational purposes only. I am not responsible for any accidents, injuries, or damages resulting from the construction or use of the DIY GreenBox. Please proceed with caution and at your own risk. ⚠️
Partlist:
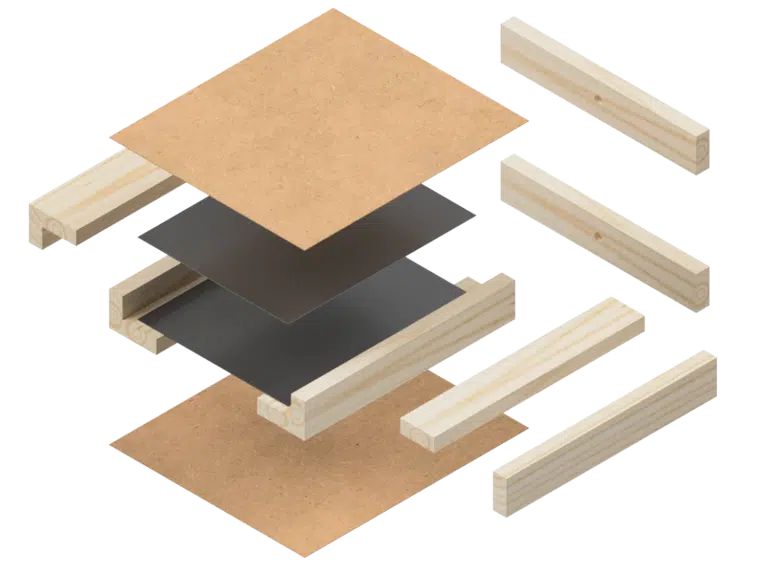
- x8 Spruce wood 18×44 mm 29cm
- x2 Spruce wood 18×44 mm 26cm
- 2.5 mm MDF sheet
- 2x Metalplate 2 mm (1 or 1.5mm are also ok) 20x25cm
- Plain steel, not stainless
- A4 acrylic sheets 2mm
- steel washers
- Glass Petri dishes, 75×15 mm
- +10kV HV-Generator
- Capacitor 20kV 1nF
- High voltage resistor 20kV 1 MegaOhm
- Earthing cable
- High voltage cable 20kV
- Junction box
- Warning stickers for electrical voltage
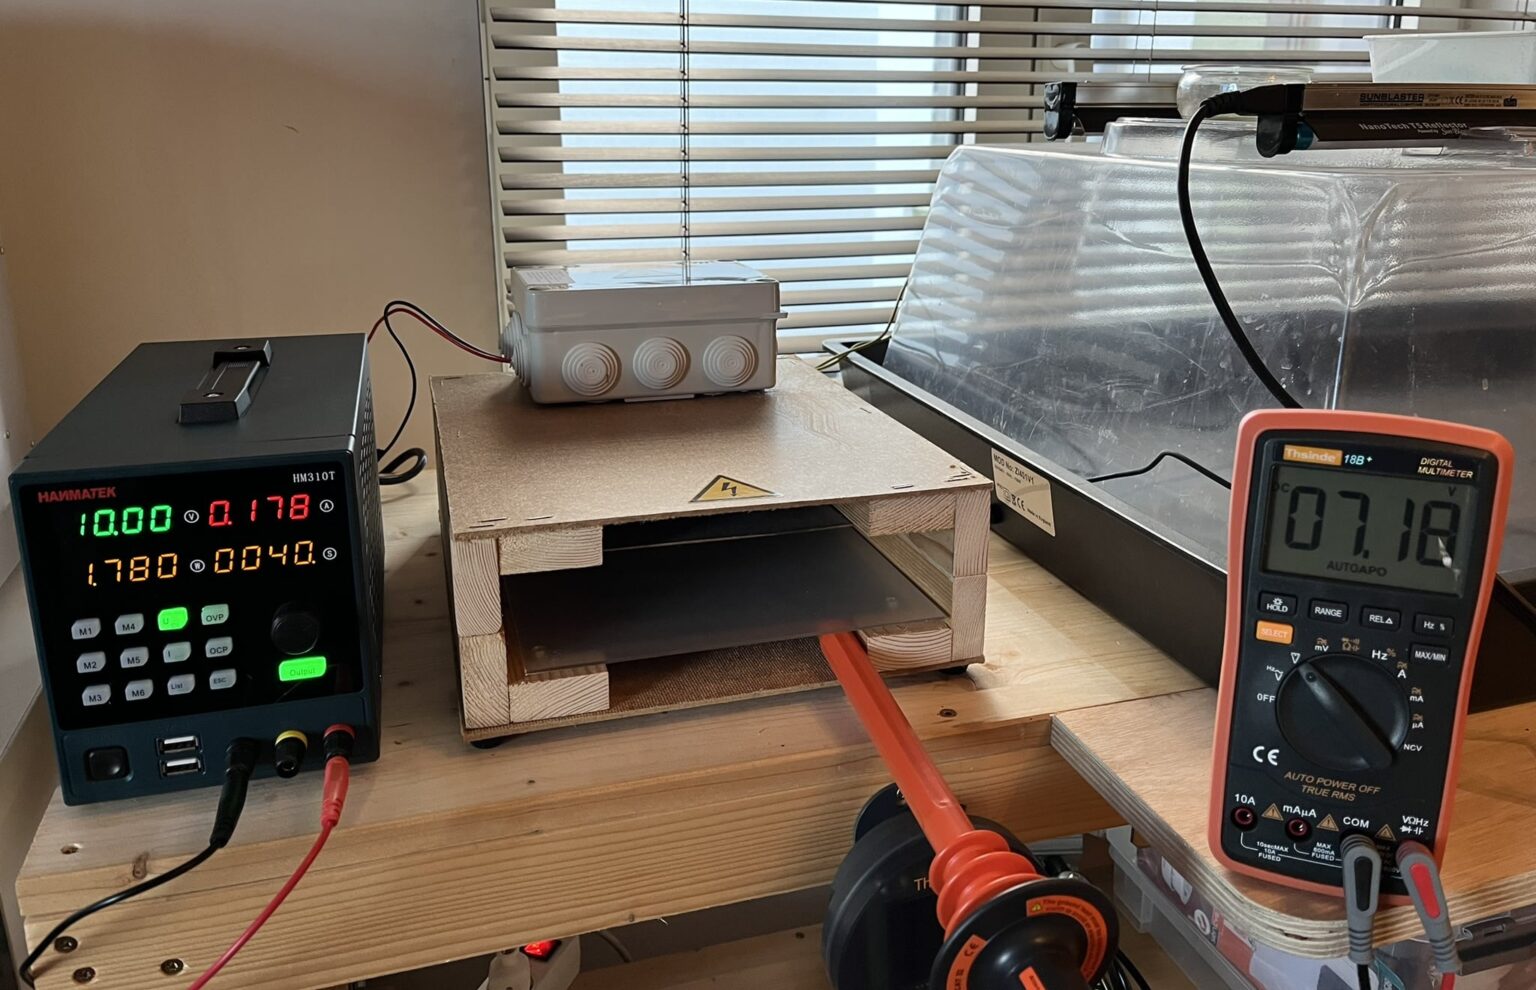
- DC Power Supply Variable (I use the HANMATEK HM310T)
- Multimeter
- High voltage probe 40kVDC +28kVAC measurement with multimeter
- Soldering station
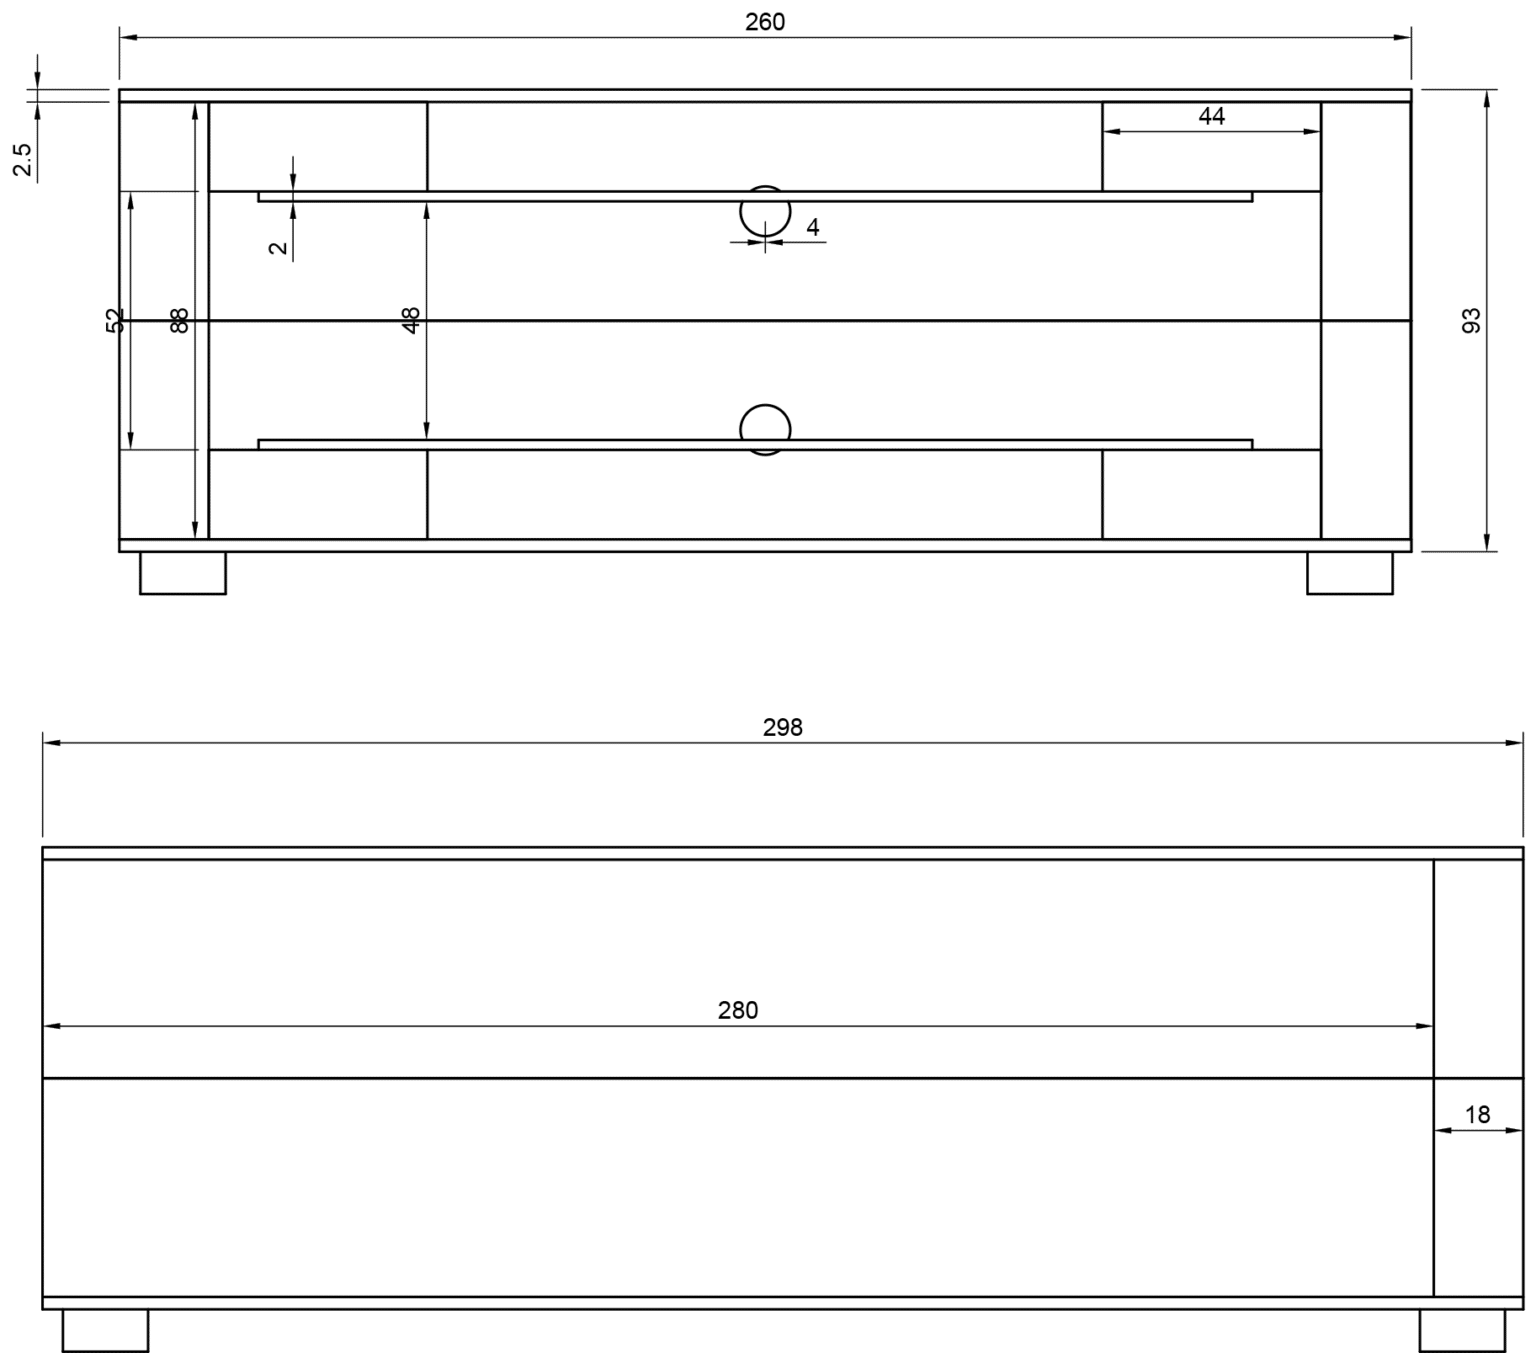
 1) Beginning with Precision Wood Cutting: Start by meticulously sawing your wooden slats (18x44mm). You’ll need eight pieces measuring 29 cm each and two pieces at 26 cm. Precision in these measurements is key to ensure a seamless fit later on.
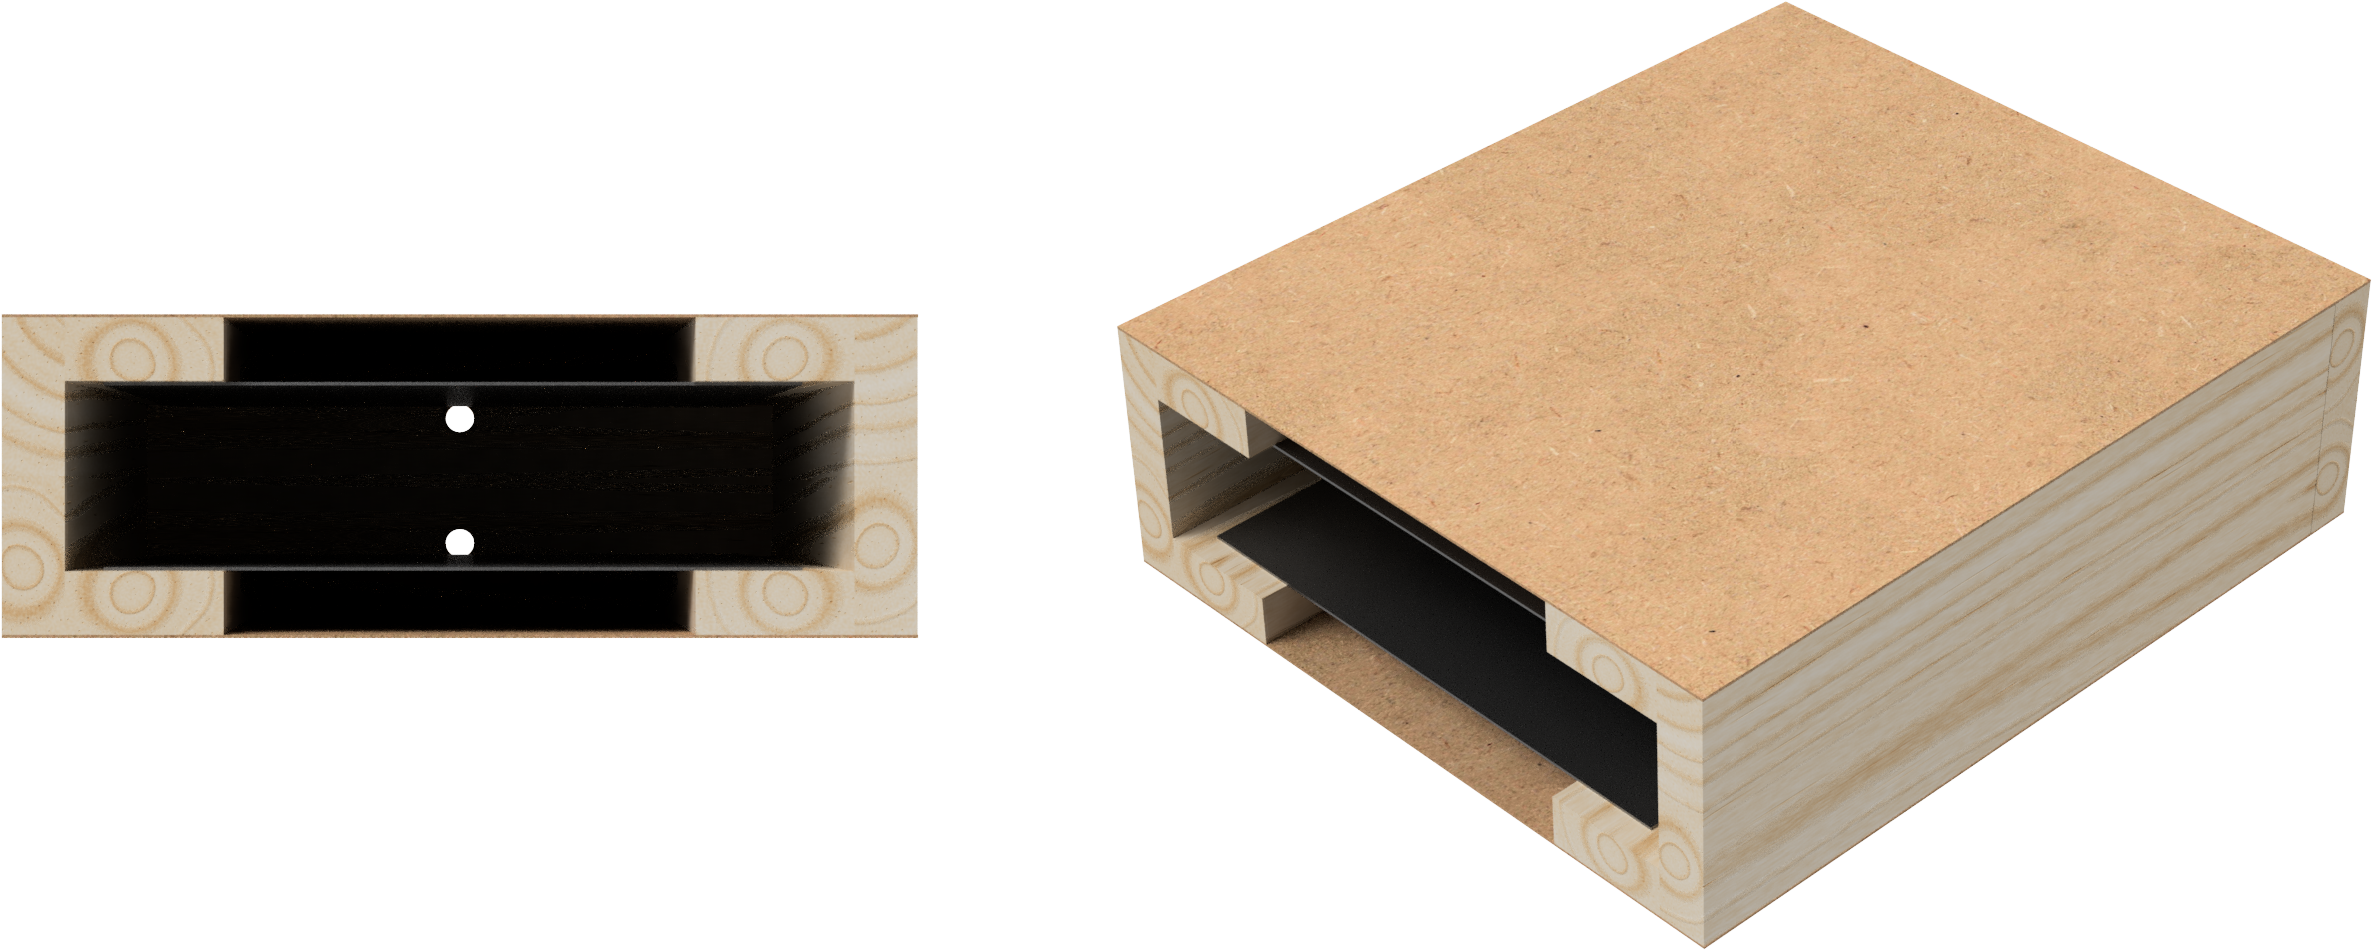
2) Creating the L-Shaped Structures: Next, use wood glue to bond the 29 cm pieces into four L-shaped structures, as shown in the accompanying illustration. Apply the glue evenly and use clamps to hold the pieces firmly in place until they’re securely bonded. This step is crucial for the stability of your project.
3) Drilling Central Holes: Now, take the 26 cm pieces and carefully drill a 5mm hole in the center of each.
 4) Assembling the Framework: Attach two L-shaped pieces to each 26 cm slat, as per the illustration. This creates a frame-like structure, with two of these needed for the top and bottom of your box. Ensure that the alignment is precise for a neat finish.
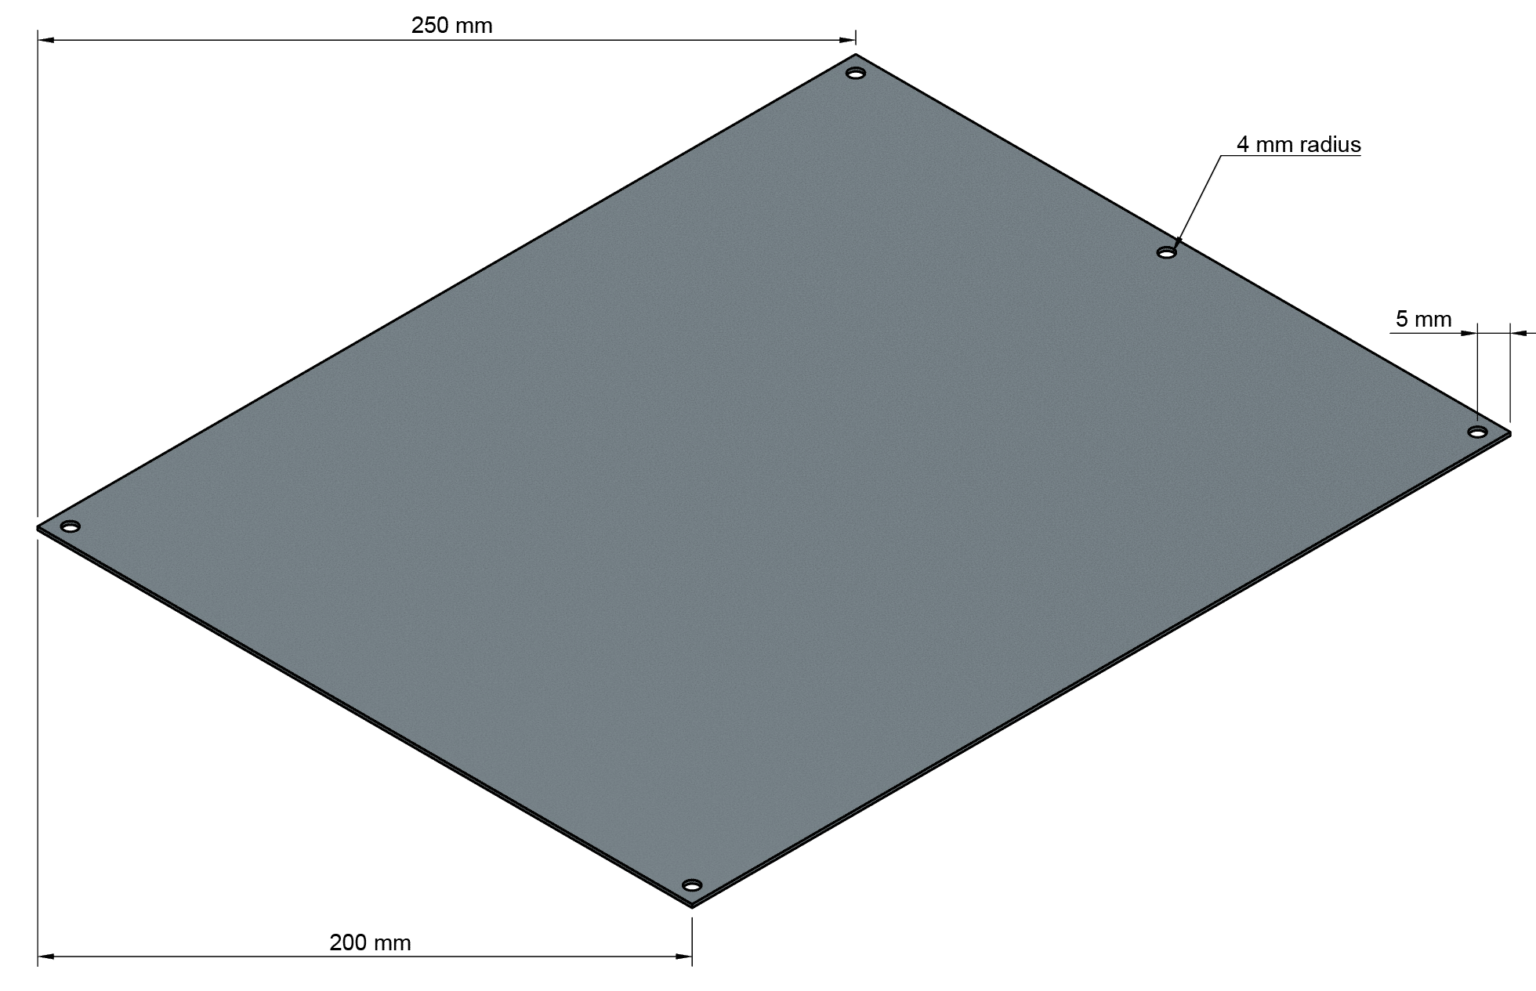
5) Metal Plates Preparation: Cut two metal plates to the dimensions of 20×25 cm. Following the pattern shown in the illustration, drill 4mm holes in each plate.
 6) Wiring Installation: Begin with the first plate and meticulously attach a red high-voltage cable. Ensure it’s firmly secured using a robust blind rivet and a sturdy metal ring, providing a reliable and durable connection. For the second plate, proceed with similar precision to attach the grounding cable.
7) Aligning and Securing the Plates: Align the first plate on one half of your structure, screwing it in place at the corners. Thread the cable through the previously drilled rear hole. Repeat this process for the grounding plate, ensuring both plates are aligned directly opposite each other.
 8) Joining the Two Halves: Carefully glue the two halves of your structure together. Use clamps to hold them in place until the glue sets. This is a pivotal moment in your project, as the two halves become one solid unit.
9) Attaching MDF Pieces: On a 2.5 mm MDF sheet, mark and cut out the top and bottom pieces for your box. Glue these pieces to your structure, ensuring they fit snugly.
 10) Attaching Rubber Feet for Stability and Isolation: Install rubber feet at the corners of the plate with the red wire, which will be the bottom side. This not only ensures stability but also offers crucial electrical isolation, protecting your project and the surface below.
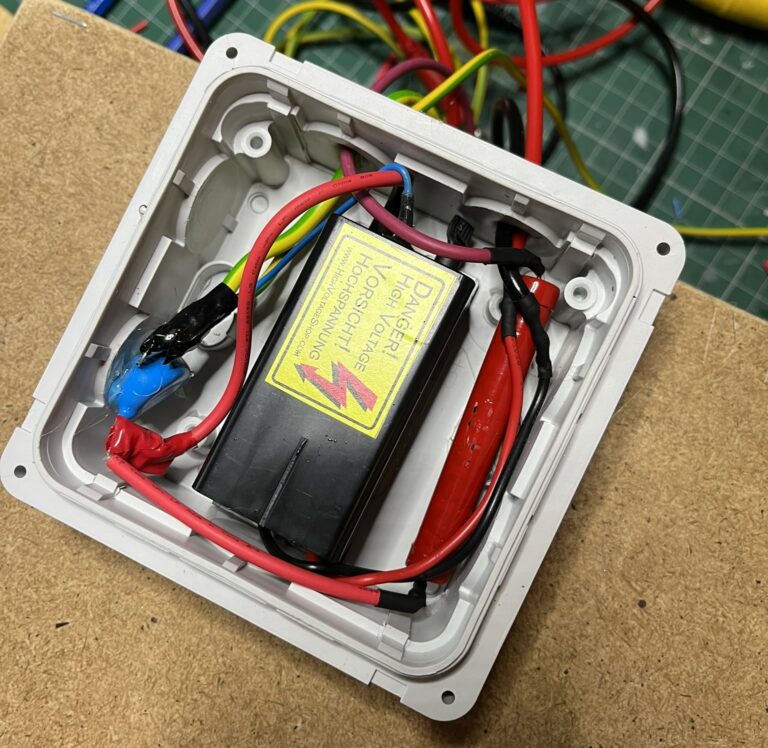
11) Securing the Junction Box: Affix the junction box to the back of the upper MDF plate using a hot glue gun for a strong, durable bond.
Constructing the E-field Generator
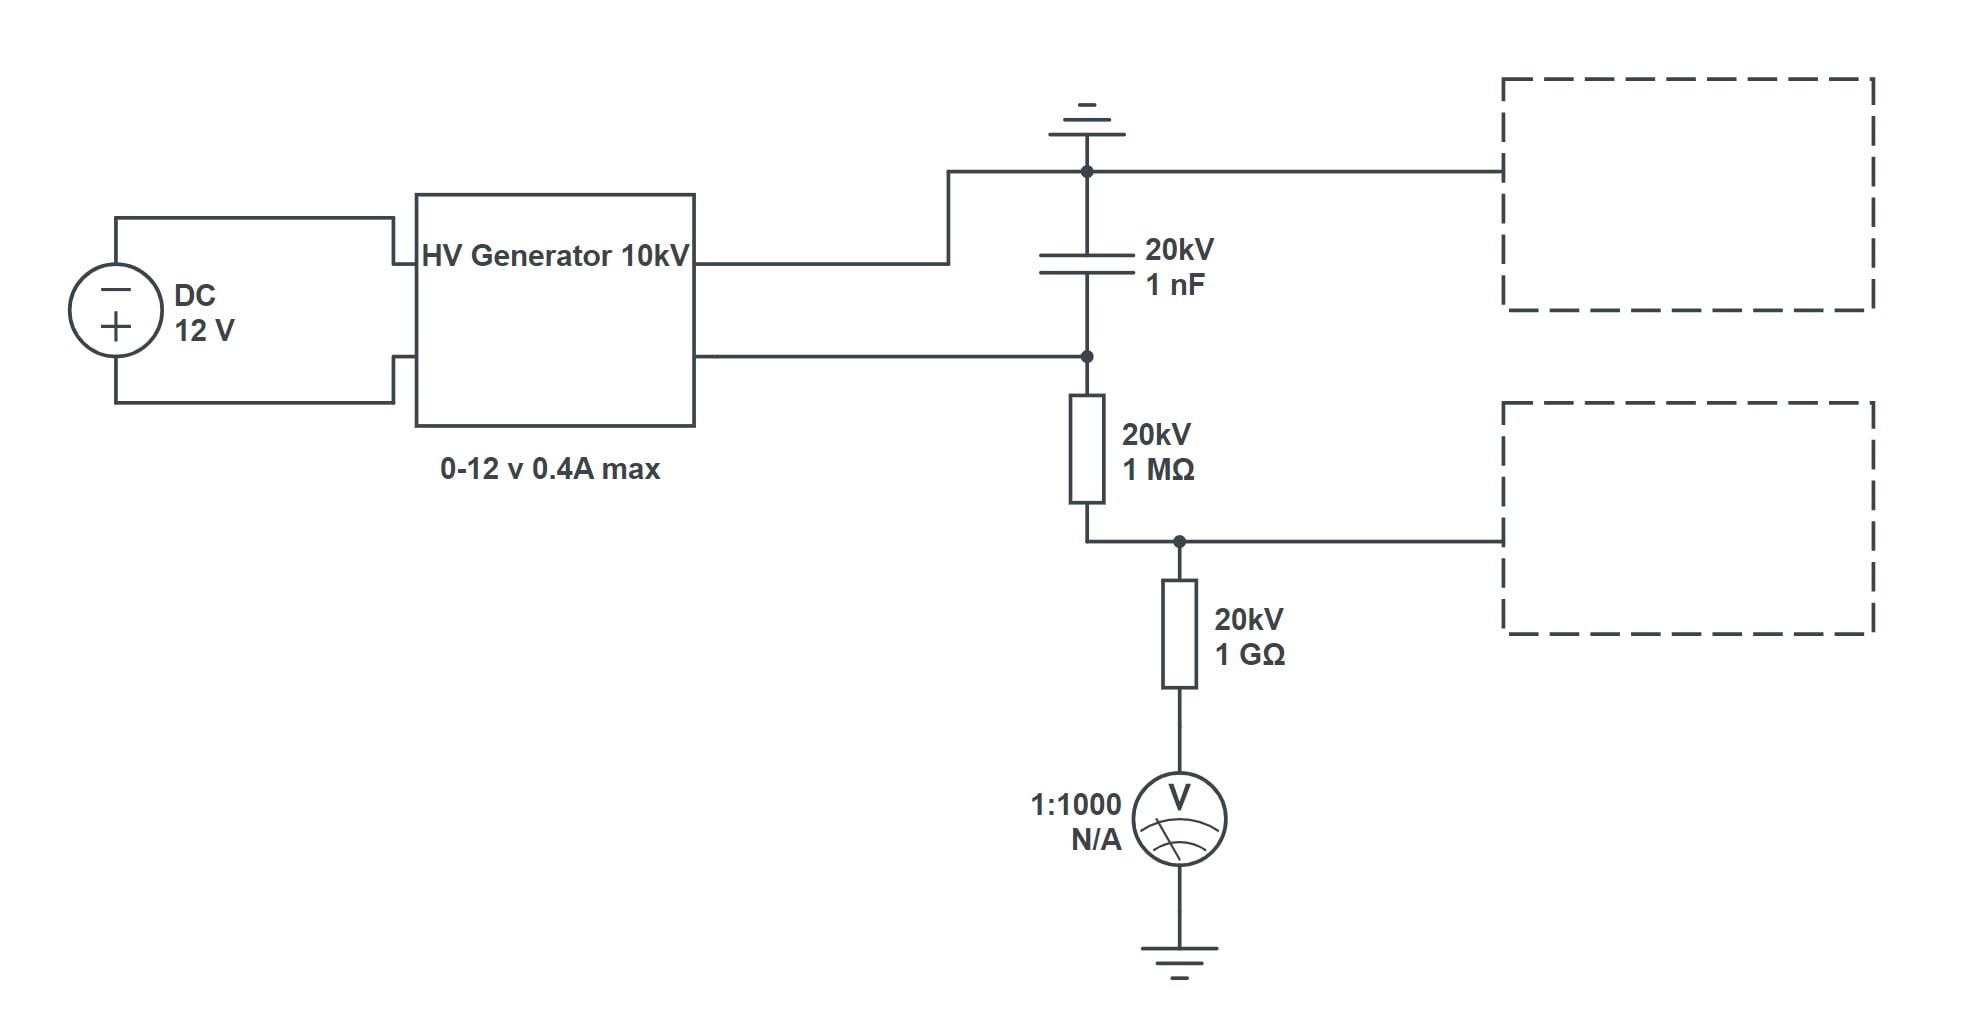
- Mount the 10kV HV Generator securely, ensuring it’s isolated from any conductive surfaces (hot glue gun). This device will create the high voltage necessary for generating an electric field (E-field).
- Connect the 20kV 1nF capacitor directly to the HV Generator’s output. This capacitor stabilizes the E-field by storing and releasing electrical energy in a controlled manner.
- Integrate the 20kV 1 MegaOhm resistor in series with the capacitor. This high-voltage resistor limits the current, which is vital for the consistent generation of the E-field and for safety.
- Run the 20kV-rated high-voltage cable from the other terminal of the resistor. This cable will transmit the high voltage to the metal plates, which will form the E-field.
- Connect the earthing cable to the negative metal plate to ground the setup, providing a reference point for the E-field and enhancing safety.
- HV Generator Power Connection: – To connect the HV Generator to the power supply, prepare wires with soldered banana plugs. This will provide a secure and reliable connection. – Carefully solder the banana plug-equipped wires to the power input terminals of the HV Generator, ensuring a solid joint. – It’s crucial not to exceed the maximum input voltage for the HV Generator to avoid damage. For the model used in this project, the limit is 12V. – As an additional safety measure, set the maximum voltage on the power supply unit to 12V and 0.4 A. This acts as a protective feature during experimentation, allowing for safe adjustments of power levels.
- Safety Note: Always verify that the power supply voltage matches the requirements of the HV Generator before turning on the power. This step is essential to prevent overvoltage damage and to maintain safety during the operation
Measuring and Calibrating the E-field:
To accurately measure the strength on the plates, employ a high voltage probe with a 1:1000 ratio, ensuring a safe measurement environment. To calculate the desired field strength, use the calculator below on our website. For example, if we measure a voltage strength of 3700 volts (3.7 x 1000) and given that the distance between the plates is 48mm, we would achieve an electric field strength of 770 V/cm.
The most commonly used electric field strengths are 750, 1250, and 1500 V/cm. Therefore, in this configuration, this would mean that we need a voltage strength of 3600, 6000, and 7200 volts respectively.
The interactive tool "E-Field Calculator" is designed to help you easily calculate the electrostatic field (E-field) and voltage across two parallel plates. This calculator is user-friendly and provides real-time calculations, making it a great resource if you experimenting with the Ebner effect.